jeudi 31 août 2017

Denim and Friends Mini - Maja Design DT

Bonjour à toutes,

Aujourd'hui je suis sur le blog de Maja Design avec un nouveau projet réalisé avec la collection Denim and Friends. J'ai créé un mini-album qui rentre dans une enveloppe 15 x 15 ! Est-ce que ce n'est pas cool de pouvoir envoyer un mini avec les photos prises lors de votre sortie entre filles avec votre amie, les photos de votre bébé pour un parent qui est loin, ... ?

Hello Sweeties
Today I'm up on Maja Design blog with a new project made with the Denim and Friends collection. I created a mini mini-album that can fit in a 6x6 envelope! How cool is that to be able to send a mini with the photos taken during a girl's night to a dear friend, the photos of your baby to a relative who is far away, ...?


Comme je vous le disais le mini rentre dans une enveloppe 15x15.

As I tell you this mini fits in a 6x6 envelope.


J'ai utilisé les bandes à la base des pages pour ajouter quelques décorations étant que je veux garder le mini aussi plat que possible.

I use the bands at the bottom of the Denim and Jeans papers to add some decorations as I want to keep the mini as flat as possible.


Le mni a quelques pochettes où vous pouvez mettre vos photos.

The mini has a few pockets where you can put your photos.


Dans le milieu, j'ai ajouté deux pages mais vous pouvez en ajouter plus si vous le souhaitez.

In the middle, I add two pages but you can add more if you want.


Et voici le modèle pour réaliser le mini (en anglais et en français):

And here is the pattern to make this mini (in English and French)

Pattern (")
Modéle (cm)


Matériels / Materials:

Maja Design papers

Denim-P
Denim and Friends
Paisley
Paisley
Paisley bs
Paisley bs
Blazer
Blazer
Drivers License bs
Drivers LIcense bs
Summer shirt bs
Summer Shirts bs
Snapshots
Snapshots


Where can you purchase MajaDesign Papers?

MajaDesign collections are sold all around the world - 33 countries and growing with new stores being added often. Are you looking for a store location that sells Maja collections? Here is a helpful Store Finder link to help you shop. If your favorite store is not on this list, consider asking them to carry MajaDesign.


mercredi 30 août 2017

L'Islette - Blue Fern Studios DT

Bonjour à toutes,

Voici mon troisième project mensuel pour Blue Fern Studios. J'ai travaillé avec la collection Happy Accident pour mettre en page cette photo du château de l'Islette qui abrita les amours tumultueuses de Camille Claudele t Auguste Rodin.

Hello Sweeties

Here is my third monthly project for Blue Fern Studios. I work with the Happy Accident collection to showcase a photo I've taken of the castle of L'Islette where the tempestuous love affair between the two sculptors Camille Claudel and Auguste Rodin was sheltered.


Comme d'habitude j'ai protégé le fond avec du gesso transparent. Puis j'ai ajouté un motif à l'aide d'un pochoir et de pâte graphite. Une fois sec, j'ai adouci le motif avec du gesso blanc.

As usual, I primed the background with clear gesso. Then I added a design with a stencil and Graphite paste. When dry, I toned down the design with white gesso.


Pendant que le fond séchait, j'ai recouvert les "Leafy twigs" avec du gesso blanc et le cadre Manchester aec du gesso noir. J'ai utilisé des cires pour terminer le cadre.

While the background was drying, I primed the Leafy Twigs with white gesso and the Manchester Frame with black gesso. I used some waxes to alter the frame.


J'ai coloré les feuilles avec différentes teintes d'aquarelles vertes et je les ai saupoudrées de poudre à embosser Avocado tant qu'elles étaient encore humide. Après les avoir embossées, j'ai ajouté de la cire verte.

I colored the leaves with different shades of green watercolor and sprinkled them with the Avocado embossing powder while they were still wet. After having embossed them, I added some green wax.


J'ai coupé quelques papiers pour mettre sous la photo dans la feuille Layering Cards et j'ai collé tous les embellissements avec du gel 3D.

I cut some papers to add under the photo in the Layering Cards sheet and I glued all the embellishments with a 3D gel.


Pour terminer la page j'ai ajouté quelques microbilles, des glitters et des flocons de mica.

To finish the layout I added some seedlings and glitter.


Matériels / Materials:

Blue Fern Studios products:

Happy Accident - Incident
Incident
Happy Accident - Layering Cards
Layering Cards
Leafy Twigs
Leafy Twigs
Manchester Frame
Manchester Frame
Seedlings - Twig
Twig
Seedlings - Paprika
Paprika
Seedlings - Mustard
Mustard
Embossing Powder - Avocado
Avocado
Glitter - Orange Peel
Orange Peel

Other products:
  • Twinkling H2O - ColourArte (Mocha Rose, Jasper Red, Fern, Forest Green);
  • Flowers - 49 and Market (Garden Blooms: Alabaster);
  • Stencil - TCW (Music Note);
  • Art Ingredients - Finnabair Prima (MIca Flakes: Gold);
  • Art Extravagance - Finnabair Prima (Graphite Paste);
  • Art Basics - Finnabair Prima (Clear Gesso, White Gesso, Black Gesso, 3D Matte Gel, Soft Matte Gel).

mardi 29 août 2017

The Goddess - Blue Fern Studios DT

Bonjour à toutes,

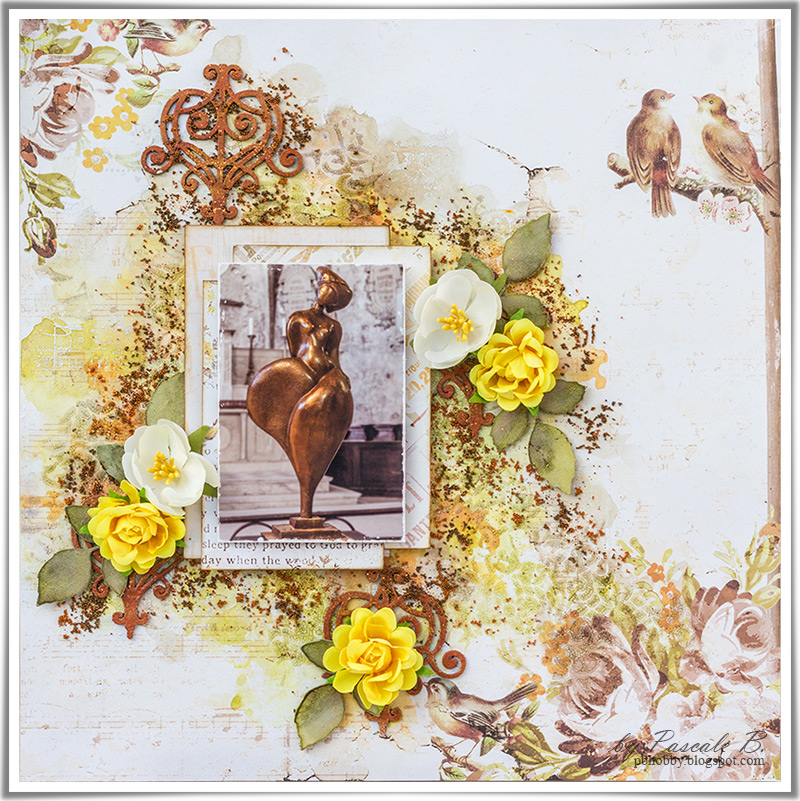
Voici mon deuxième projet mensuel pour Blue Fern Studios. J'ai utilisé la collection Amber and Apricot pour mettre en page cette photo d'une sculpture d'Edith Guillaume.

Hello Sweeties

Here is my second project for Blue Fern Studios this month. I used the Amber and Apricot collection to lay out this photo of a sculpture from Edith Guillaume.


J'ai protégé le fond avec du gesso transparent. Puis j'ai ajouter un motif à l'aide d'un pochoir et de pâte à craqueler transparente que j'ai laissé sécher naurellement.

I primed the background with clear gesso. Then I added a design with a stencil and clear crackle paste. I let dry naturally.


J'ai recouvert la bordure de Krystal avec du gesso blanc. Puis je l'ai embossée avec différentes poudres à embosser pour obtenir une couleur proche de celle de la statue.

I primed Krystal's border with white gesso. Then I embossed it with different embossing powders to match the color of the statue.


Une fois le fond sec, j'ai ajouté une autre motir avec de la poudre à ambosser Pearl et le tampon Departure. Puis j'ai ajouté de la couleur avec plusiers aquarelles.

When the background was dry, I added another design with the Departure stamp and the Pearl embossing powder. Then I added some color with different watercolors.


J'ai recouvert les feuilles de rose avec du gesso blanc avant de les peindre avec differentes aquarelles dans les tons de vert et de brun.

I primed the Rose leaves with white gesso before painting them with different shades of green and brown watercolors.


J'ai coupé quelques papiers de la collection Amber et Apricot pour mettre sous la photo et j'ai collé tous les embellissements avec un gel 3D.

I cut a few papers from the Amber and Apricot collection to add under the photo and I glued all the embellishments with a 3D gel.


Pour terminer la mise en page, j'ai ajouté des microbilles et des glitters.

To finished the layout I added some seedlings and glitter.

Matériels / Materials:

Amber and Apricot - Birdsong
Birdsong
Amber and Apricot - Tweet Melody
Tweet Melody
Amber and; Apricot - Yesteryear
Yesteryear
Fresh Florals
Fresh Florals
Krystal's Border
Krystal's Border
Rose Leaves
Rose Leaves
Embossing Powder - Chili Powder
Chili Powder
Embossing Powder - Nutmeg
Nutmeg
Embossing Powder - Auburn
Auburn
Embossing Powder - Pearl
Pearl
Seedlings - Paprika
Paprika
Seedlings - Twig
Twig
Glitter - Autumn
Autumn
Stamp - Departure
Departure
Other products:
  • Twinkling H2O - Colourarte (Golden Bamboo, Wild Vine, Cedar Wood, Apricot Nectar, Yellow Rose);
  • Art Extravagance - Finnabair Prima (Clear Crackle Paste);
  • Art Basics - Finnabair Prima (Clear Gesso, White Gesso, 3D Matte Gel, Soft Matte Gel).
Related Posts Plugin for WordPress, Blogger...