Affichage des articles dont le libellé est 7 Dots Studio. Afficher tous les articles

mardi 10 décembre 2024

Why stop dreaming? - Layout for Dusty Attic

Hello Sweeties,

Today I'm up on Dusty Attic blog with a layout. 
Photo: @ArtHouseWhimsy (A December Dream)

I primed the paper with clear gesso before adding a design with the Starring Night stencil and 3G Gloss Gel. Before the gel dried, I sprinkled some clear glitter.


I primed all the chipboards I'd selected with white gesso and then covered them with White Pearl wax. 


I added French Lavender wax on top of the  Christmas Berries #1. 


I used the Old Denim wax to accent the middle of the Poinsettia #2 and the fruits of Foliage #22.


I added a few tags under the photo and layered them with the chipboards. 

Dusty Attic products:
Other products:
  • Paper - 7 Dots Studio (Stargazer: Celestial Bodies, Tags);
  • Art Ingredients - Finnabair Prima (Spring Glitter set);
  • Art Alchemy waxes - Finnabair Prima (White Pearl, French Lavender, Old Denim);
  • Art Basics - Finnabair Prima (Clear Gesso, White Heavy Gesso, 3D Gloss Gel).

jeudi 4 juillet 2024

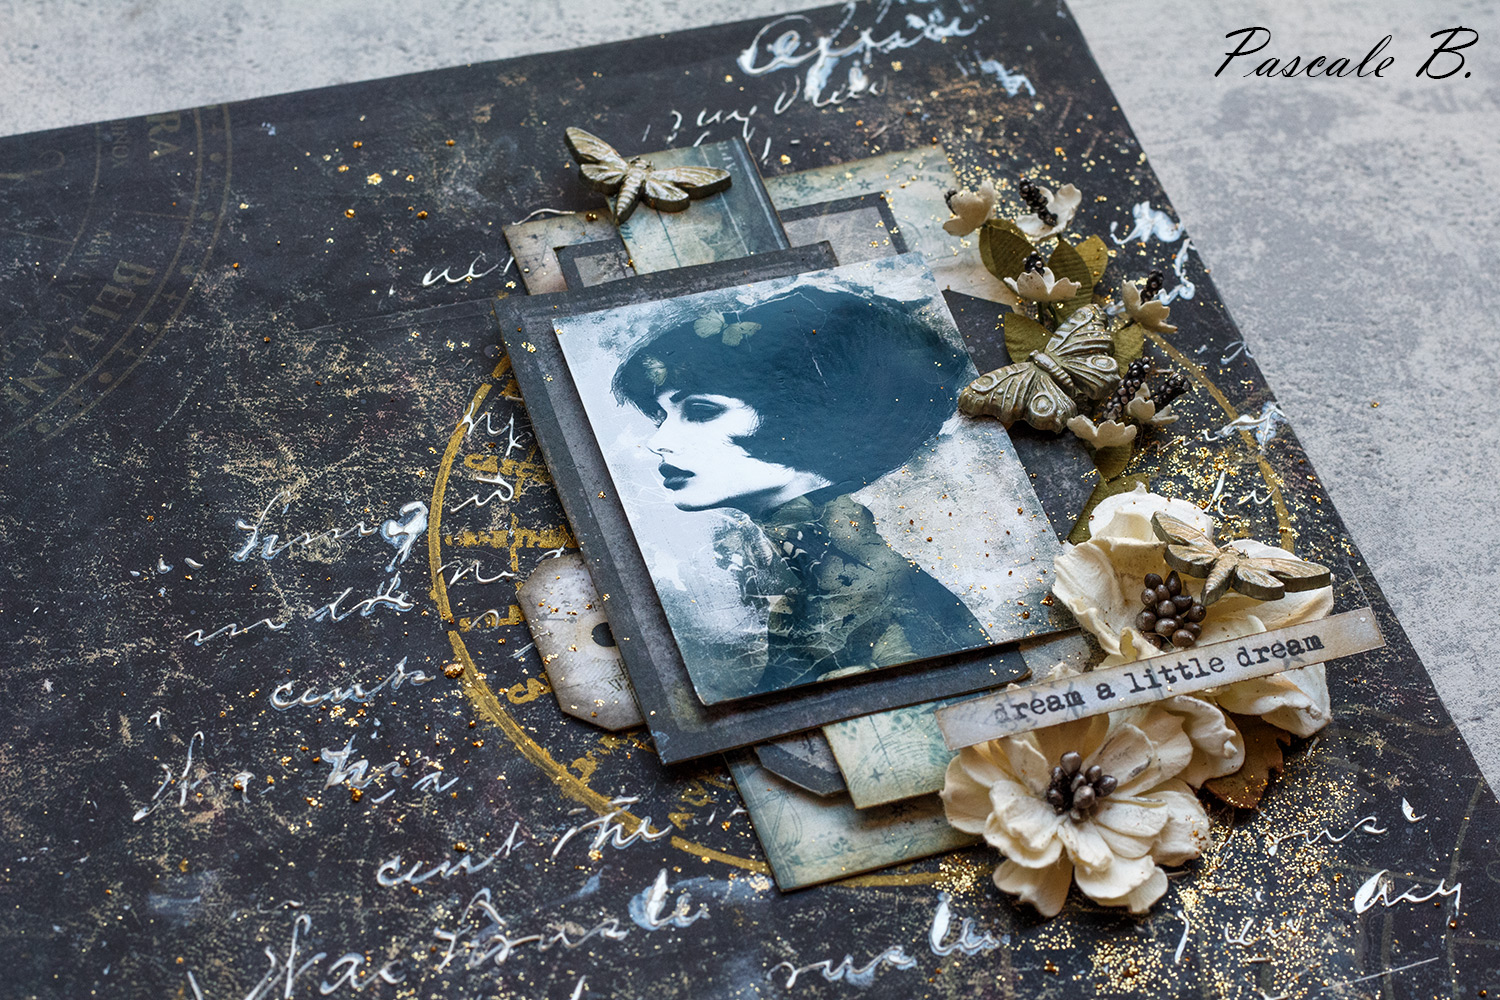
Dream a little dream - Mixed media panel

Hello Sweeties,

Today I have a mixed media panel realised with the Stargazer paper collection from 7 Dots Studio designed by Finnabair. I used a photo made with @ArtHouseWhimsy designs and photo.


I glued the Star Menagerie paper on a canvas board, then covered it with clear gesso. I added two designs: the first with Honey wax and the "Rocket Science" stencil, and for the second, I used the "Read My Letter" stencil and the Frosting Pearl Icing paste


I selected some tags as well as some paper from the 6x8 paper pad to add under the photo. 


I altered the resin butterflies with Black Gold and Old silver waxes and added a few flowers on the side.


The title came from the Word stickers.


To finish, I splattered gold glitter mixzd with dulited soft gel


bla


Products used:
  • Papers - 7 Dots Studio (Stargazer: Star Menagerie, Tags, 6x6 paper pad, Word Stickers)
  • Flowers - 49 and Market (Cream Nature's Bounty);
  • Stencil - Finnabair Prima (Rocket Science, Read my letter);
  • Art Ingredients - Finnabair Prima (Luminous Glitter Set);
  • Art Alchemy - Finnabair Prima Waxes (Honey, Old Silver, Black Gold);
  • Art Extravagance - Finnabair Prima ();
  • Art Basics - Finnabair Prima (Clear Gesso, Heavy Body Gel, Soft Gloss Gel).

jeudi 1 février 2018

Tango - Lindy's Gang DT

Bonjour à toutes,

Le temps est venu pur un nouveau challenge de couleur chez Lindy's Gang. Voici mon project :

Hello Sweeties

Time for a new color challenge at Lindy's Gang. Here is my project:


Et voici le combo de ce mois de février.Vous retrouverez toutes les informations pour participer sur le blog de Lindy's Gang.


And here is the February color combo. You can find all the information to participate on Lindy's Gang blog.


J'ai commencé par protéger le fond avec une couche de gesso transparent. Ensuite, j'ajouté un motif à l'aide d'un pochoir et de gel 3D brillant. Pendant que le gel était encore humide, j'ai saupoudré de la poudre à embosser Geranium Coral Blush EP que j'ai embossé à chaud.

First I primed the background with clear gesso. Next, I added a design with a stencil and 3D Gloss Gel. While the gel was still wet, I sprinkled some Geranium Coral Blush EP and embossed it.


Ensuite, j'ai coupé le fond pour créer des ouvertures. Bien sûr, j'ai collé un morceau de papier sous chacune des ouvertures que j'ai faites.

Next, I cut the background to open some pocket. Of course, I glued a piece of paper under each opening I've just made.


J'ai coloré le fond avec Wild Honeysuckle Coral et Sweet Violet Purple Teal. Trouvant que c'était un peu trop rose à mon goût, j'ai rajouté Long John's Silver et Steel Shimmer pour l'atténuer.

I colored the background with Wild Honeysuckle Coral and Sweet Violet Purple Teal. I found that it was a little bit to pink for my taste, so I added some Long John's Silver and Steel Shimmer to mute it.


J'ai coloré quelques fleurs ainsi que des découpes de feuilles avec les mêmes couleurs que celles utilisées pour le fond. Une fois tout sec, j'ai collé tous les embellissements: morceaux de dentelle, fleurs, feuilles et embellissements métalliques.

I colored a few flowers as well as some die cut leaves with the same colors I used to color the background. When everything was dry, I glued all the embellishments: pieces of doily, flowers, leaves and metal embellishments.


Pour finir la mise en page, j'ai ajouté un peu de mousse, des Art Stones et des microbilles.

To finish the layout, I added some moss, Art Stone, and microbeads.


Matériels / Materials:

Lindy's Stamp Gang products:
Wild Honeysuckle Coral
Wild Honeysuckle Coral*
Sweet Violet Purple Teal
Sweet Violet Purple Teal*
Long John's Silver
Long John's Silver
Industrial Chic- MAGICAL Shimmer Powders
Industrial Chic Magicals
Geranium Coral Blush
Geranium Coral Blush EP*
* February Limited Edition kit

Other products :
  • Papers - 7 Dots Studios (Writer's Block - Sincerely, 6x6 pack);
  • Flowers - 49 and Market (Roses - White, Seaside Blooms - Cotton);
  • Stencil - Stamper's Anonymous (Ornate);
  • Die - Memory Box (Botanical STem);
  • Mechanicals - Finnabair Prima (Mechanicals Flowers, Mechanicals Flowers Medium);
  • Art Ingredients - Finnabair Prima (Art Stones, Microbeads: Silver);
  • Art Basics - Finnabair Prima (Clear Basic, 3D Gloss Gel, Soft Matte Gel).

lundi 25 septembre 2017

Cherish Moment - The Scrapbook Diaries kit

Bonjour à toutes,

Aujourd'hui c'est une nouvelle page pour The Scrapbook Diaries que je vous propose. Ce qui veut dire qu'il s'agit d'un nouveau kit.
Les kits conçues par Janene contiennent tout le matériel nécessaire à la réalisation de la page ainsi qu'une page bonus et l'accès illimité à la vidéo montrant chaque étape de la création de cette page.

Hello Sweeties

Today it's a new layout for The Scrapbook Diaries that I want to share with you. It means that it's a new kit.
The kits designed by Janene included all the material needed for this page and a bonus page as well as an unlimited access to a step-by-step video.


J'ai travaillé avec des papiers de 7 Dots Studios de la collection Dreamscape, ...

I worked with papers from the Dreamscape collection from 7 Dots Studios, ...


... avec des fleurs Prima, des chipboards de Scrapiniec, embellissement en résine ...

...  flowers from Prima, chipboards from Scrapiniec, resin embellishment ...


... des Twinkling H2Os et des micro-billes.

... some Twinkling H2Os and micro beads.


Et d'autres gros plans :

And more details:


Vous pourrez commander ce kit ici.

You can order the kit here.


Matériels / Materials:
  • Papers - 7 Dots Studio - Dreamscape: Tags, Twinkle
  • Twinkling H2O- ColourArte (Rubilite, Mustard Green, Cedar Wood, Burnt Umber);
  • Flowers - Prima;
  • The round resin frame,
  • Chipboard - Scrapiniec
  • Embossing Powder - Blue Fern Studios (Mushroom);
  • Prills (Gilt Trip);
  • Stencil - TCW (6x6 Tile Mania);
  • Art Basics - Finnabair Prima (Clear Gesso, Modeling Paste, 3D Matte Gel, Soft Matte Gel).

lundi 16 janvier 2017

Anemone

Bonjour à toutes,

Aujourd'hui je vous propose une page que j'ai faite pour le plaisir. J'ai choisi une photo que j'ai prise au château de Chenonceau d'un simple bouquet d'anémones.

Hello Sweeties

Today I want to share with you a layout I made just for the fun. I chose a photo that I 've taken in the castle of Chenonceau of a simple bouquet of anemones. 


J'ai commencé par protéger le fond avec du gesso transparent. Une fois sec, j'ai tamponné le fond avec un des tampons du set Old Town que j'ai embossé avec de la poudre Sticky. Ce qui m'a permis d'ajouter un effet métallique sur le fond.

First I primed the background with clear gesso. When dry, I stamped the paper randomly with one of the Old Town stamp that I embossed with the Sticky powder. Then I just rubbed on "Rainbow Puddle" foil. 


Puis j'ai ajouté un motif à l'aide d'un pochoir et de gel 3D brillant.

Next I added a design with a stencil and 3D Gloss gel and let dry. 


J'ai découpé des feuilles dans du papier aquarelles et j'ai coloré les premières avec de la peinture argent et des Twinkling H2Os vertes. J'ai coloré les autres dans des tons de bruns.

I die-cut some leaves in a  watercolor paper and I colored the first ones with the Silver Art Alchemy and two shades of green Twinkling H2Os. I colored the other ones with brown shades.


J'ai coloré le fond avec des H2Os bleus et vertes et de la peinture métallique argent.

I colored the background with different shades of blues and green H2Os and silver Art Alchemy. 


J'ai ajouté du sisal noir, avant de coller tous les embellissements. J'ai terminé la page avec des microbilles et des glass glitter.

I added some black sisal, before gluing all the embellishments I finished the layout with some micro beads and glass glitter.


Matériels / Materials:
  • Papiers / Papers - 7 Dots Studio (Writer's Block : Torn, 6x6 pad) ;
  • Twinkling H2O - ColourArte (Sweet Alfalfa, Wild Vine, Go Navy, Rich Cobalt) ;
  • Fleurs / Flowers - Wild Orchid Crafts (Poppy, Tuscany Rose, Tuscany Rosebud) ;
  • Matrice de coupe / Die - Memory Box (Botanical Stem) ;
  • Embossing Powder - Ranger (Sticky) ;
  • Foil - Prima (Rainbow Puddle ) ;
  • Pochoir / Stencil - Finnabair Prima (Doily) ;
  • Tampon / Stamp - Finnabair Prima (Old Town) ;
  • Art Alchemy - Finnabair Prima (Silver) ;
  • Art Ingredient - Finnabair Prima (Micro Beads: Silver, Glass Glitter: Platinum) ;
  • Art Basics - Finnabair Prima (Clear Gesso, 3D Gloss Gel, Soft Matte Gel).

vendredi 2 décembre 2016

Sunset - The Scrapbook Diaries DT

Bonjour à toutes,

Aujourd'hui c'est une nouvelle page-kit réalisée pour The Scrapbook Diaries que je vous propose de découvrir.
Les kits conçues par Janene contiennent tout le matériel nécessaire à la réalisation de la page ainsi qu'une page bonus et l'accès illimité à la vidéo montrant chaque étape de la création de cette page.

Hello Sweeties


Today it's a new layout-kit for The Scrapbook Diaries that I want to share with you.
The kits designed by Janene included all the material needed for these page and a bonus page as well as an unlimited access to a step-by-step video.


J'ai choisi de travailler sur une photo d'un coucher de soleil que j'ai prise récemment. Et je suis sûre qu'en cette période estivale vous aurez aussi très certainement des photos avec ce thème à scrapper.

I chose to work on a photo of a sunset I've taken recently. I'm pretty sure, being in summer, that you will certainly have some photos of sunset to scrap too.


J'ai utilisé un papier bois pour donner l'illusion d'une palissade ...

I used a wood paper to give the illusion of a fence ...


... que j'ai recouvert partiellement de pâte à craqueler blanche ...

... which I covered randomly with a white crackle paste ...


... des Gelatos pour la couleur, quelques fleurs ...

... some Gelatos for the color, some flowers ...


... et des touches d'or...

... some gold hints ...


Vous pouvez commander ce kit ici.

You can order the kit here.


Matériels / Materials:
  • Papers - 7 Dots Studio (Yuletide - Chestnut, Sugarplum and Gingerbread) ;
  • Gelatos - Faber Castell (Caramel, Pistachio, Mango, Tangerine & Chocolate) ;
  • Silks - ColourArte (Emperor Gold) ;
  • Flowers :
    • Prima (Rose Gold Kiss) ;
    • The Scrapbook Diaries (Organza Floral Pick Brown) ;
  • Chipboard - Blue Fern Studios (Flourishes) ;
  • Prills - Artquest (I'm Amaze) ;
  • Stamp - 49 and Market (Vintage Artistry) ;
  • Art Ingredients - Finnabair Prima (Mica Flakes: Gold Leaf, Mica Powder: Gold) ;
  • Art Extravagance - Finnabair Prima (White Crackle Paste) ;
  • Art Basic (Soft Matte Gel, Clear Gesso, 3D Matte Gel).

mercredi 24 décembre 2014

Winter Fairy - Mixed Media Place challenge


Bonjour à toutes,

Quand j'ai lu la consigne que France nous propose pour ce nouveau challenge Creative Gym, je n'ai pas pu résister à refaire une petite robe. J'ai travaillé cette fois principalement avec la nouvelle collection d'Anaï pour 7 Dots Studio : Soulmates. Les couleurs de cette collection ne sont-elles pas parfaites pour le thème de l'hiver ?

Hello Sweeties,

Time for a new Creative Gym challenge at Mixed Media Place. Today France want us to create a project with Wings.
I couldn't resist to make a new dress. I worked this time with the new collection designed by Anai for 7 Dots Studio: Soulmates. The colors of this collection are perfect for a winter theme, don't you think ?


J'ai voulu un fond très simple. Après avoir collé deux papiers différents, j'ai simplement ajouté un motif dans les coins à l'aide d'un pochoir et de pâte à craqueler, que j'ai coloré avec une Twinkling.

I wanted a simple background. So after gluing two different papers, I simply added a pattern in the corners with white crackle paste and a stencil, which I lightly colored with Twinkling.


J'ai commencé par faire la robe à l'aide de Powertex. J'ai ensuite recouvert le fourreau avec des plumes découpées dans les papiers Daydreamer et Sensuality. J'ai recouvert le buste de Art Sugar White ainsi que la bordure des plumes.

I created the dress using Powertex first. I then covered the sheath dress with feathers die-cut in the Daydreamer and Sensuality papers. I covered the bust with White Art Sugar as well as the edge of the feathers. 


Malheureusement ce n'est pas visible sur les photos, mais l'extrémité des petites branches a également été recouverte d'Art Sugar white. J'ai utilisé du Gel mat pour ajouter du Glass Glitter cuivre .

Unfortunetaly it isn't visible on the photos, but the edge of the leafy sprigs has been covered with white Art Sugar too. I used the Soft Matte Gel to add some Copper Glass Glitter. 


Pour faire les ailes, j'ai recyclé des emballages en plastique. Après les avoir découpés, j'ai enduit les ailes de Gel brillant. Les ailes du dessous ont simplement été saupoudrées de Art Sugar blanc. Pour faire celles du dessus, j'ai collé le papier et j'ai rempli les parties évidées avec du Crackle Accent que j'ai également saupoudré de Art Sugar blanc. On peut voir les craquelures sous le Art Sugar.

To make the wings, I recycled some plastic packaging. After die-cutting them, I applied a thin layer of Soft Gloss Gel. I simply added some White Art Sugar on the bottom wings. To make the top wings, I glued the paper first and I filled the hollow part with Crackle Accent that I sprinkle with Art Sugar too. The crackle are visible under the Art Sugar. 


J'ai colorée les fleurs avec des Twinkling ainsi que le feuillage.

I colored the flowers as well as the leaves with Twinkling.

Matériels / Materials:
Mixed Media Place products:

Other products:
  • Matrices de coupe / Dies:
    • Sizzix (Tattered Flowers, Fanciful Flight) ;
    • Magnolia (Rose Leaf) ;
    • Memory Box (Leafy Sprig) ;
    • Simon Says Stamp (Feather) ;
  • Powertex (Ivory).
Related Posts Plugin for WordPress, Blogger...